Duct Cleaning Services: What a Professional Cleaning Includes (and What It Doesn’t)
“Duct cleaning services” can mean anything from wiping a few supply grilles to a true, full-system cleaning of a forced-air HVAC distribution network. If you want results, the scope and method matter more than the marketing. A professional duct cleaning is a source-removal job performed under controlled containment—not a quick “blow-and-go” pass.
Table of Contents
What duct cleaning services should cover
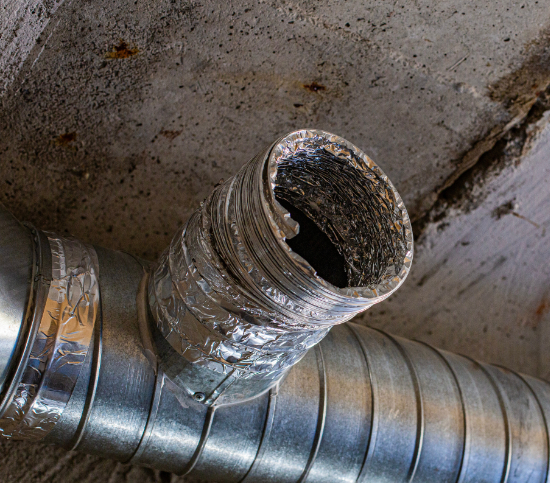
A forced-air system is more than the duct you can see behind a register. The EPA describes duct cleaning as cleaning multiple HVAC components (not just the duct run), and a legitimate residential scope typically includes:
- Supply and return trunk lines and branch runs
- Registers/grilles/diffusers (and boot boxes)
- Return cavities, filter housing, and accessible plenums
- Accessible blower compartment surfaces and fan housing
- Coils/drain pans when contamination is present and access allows
- Visual verification (photos/video) of “before and after” condition
If a quote focuses only on “vents,” you may be paying for cosmetic register cleaning and not a full system clean.
The method modern professionals use (why positive air matters)
With the RamAir approach, professional duct cleaning is built around balanced positive airflow, controlled debris dislodgement, and vacuum collection working together. Rather than forcing air backward through the system or relying on metal rotary brushes, Positive Air Duct Cleaning™ uses the HVAC system’s intended airflow direction along with compressed air and compatible vacuum collection— including truck-mounted vacuums that work with the system, not against it. The goal is to loosen and remove dust, debris, pet hair, and other particulate thoroughly without damaging ductwork, flex duct seams, or system components.
A well-run appointment usually looks like this:
- Inspection + safety check
Duct type (sheet metal vs. flex), system layout, access points, filtration, and any “stop work” hazards are identified first (for example, suspect asbestos tape or deteriorated insulation). - System setup + vacuum collection
The RamAir process is set up so airflow follows the HVAC system’s designed direction, while a high-powered vacuum—often truck-mounted or paired collection equipment—captures loosened debris. This allows the vacuum to support the cleaning process instead of pulling against the duct system. - Controlled agitation and extraction, section by section
Debris is dislodged using appropriate non-invasive tools and compressed air, with methods matched to the duct material. The objective is to remove non-adhered dust and buildup thoroughly while avoiding the risks associated with metal rotary brushes or aggressive reverse-pressure cleaning. - Reassembly + verification
Registers and grilles are cleaned and returned to position; dampers should be restored to their original settings; any service openings are properly sealed; and the crew should provide visual confirmation that the system has been cleaned beyond just the first few feet of duct.
Why “blow-and-go” cleanings fall short
Quick, low-cost “vent cleanings” often skip key components, don’t control airflow, and may stir up dust without removing it. Always ask how pressure is managed and what’s included in the scope.When duct cleaning is worth paying for
There’s no one-size-fits-all schedule. Even Steve’s HVAC guidance points to a typical multi-year cadence for “normal” homes, with more frequent service for higher-load situations (pets, smokers, sensitive occupants, or heavy dust). The more defensible approach is to clean based on triggers:
- After renovation or demolition (especially drywall dust and debris)
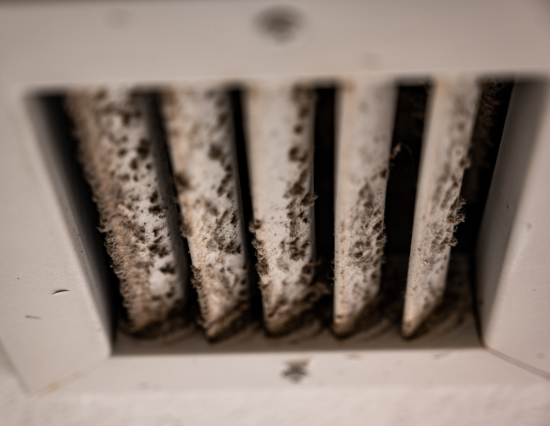
- Visible mold on hard surfaces in ducts or HVAC components (paired with fixing the moisture source)
- Pest evidence (droppings, nesting material, insect debris)
- Debris discharging from supply registers when the blower runs
- Noticeable performance drop that isn’t solved by filter changes
- Moving into a home with unknown service history
A quick homeowner pre-check can help: remove a grille and use a flashlight to look past the boot. Caked dust, cobwebs, visible growth, or debris deeper in the run is a strong sign it’s time to bring in a pro.
What duct cleaning will NOT fix
The EPA does not recommend routine duct cleaning in all circumstances and notes that research hasn’t conclusively shown that duct cleaning prevents health problems. One reason is that much of the dust in ducts adheres to surfaces and doesn’t necessarily enter the living space. Translation: duct cleaning can be appropriate and beneficial in the right scenarios, but it is not a cure-all for indoor air quality.
A reputable provider should also talk about root causes that make ducts get dirty fast:
- Filter bypass (air leaking around the filter rack)
- Return leaks pulling attic/crawlspace dust into the system
- Wet coils/drainage issues driving microbial growth
- High indoor particle sources (smoking, candles, heavy cooking, dusty remodels)
If you don’t address the source, ducts can look clean today and be dirty again sooner than expected.
Sanitizing and chemical add-ons: use only when justified
Some companies routinely upsell fogging, sealants, or broad “mold treatment.” Treat that as a decision point, not an automatic upgrade. Chemical use in ductwork should be situational and clearly explained (what product, why it’s appropriate for the duct material, how occupants/pets are protected). If there’s actual microbial growth, the correct sequence is: fix moisture first, clean affected components, then consider targeted treatment only when warranted.
| Addon Type | When It May Be Appropriate | Red Flags |
|---|---|---|
| Sanitizing / Disinfectant Fog | Confirmed microbial contamination on hard surfaces, after source moisture is corrected. | Used in every job “just in case,” with no explanation of product, dwell time, or safety. |
| Sealants / Encapsulants | Specific repairs on damaged, porous duct surfaces after cleaning. | Sprayed broadly over dirt instead of removing contamination first. |
| “Mold Treatment” Packages | Backed by lab or clear visual evidence and moisture remediation plan. | Diagnosed from a distance with no inspection, used as a blanket upsell. |
How to choose the right duct cleaning provider
Ask questions that force specifics:
- What exactly is included? Ducts only, or the full HVAC system?
- How do you maintain positive pressure and prevent dust release?
- What tools do you use for sheet metal vs. flex duct?
- Will you provide before/after photos or video?
- Are technicians trained/certified, and is the company insured?
Be wary of unusually low “whole-house” pricing without assessment, vague promises of “guaranteed health benefits,” or anyone implying they’re “EPA certified.”
Preparing for service and what to expect
Most full-system cleanings run 2-4 hours, depending on home size, duct complexity, and contamination level. Prep is simple: clear access to registers and mechanical areas, secure pets, and expect equipment noise.
For a detailed homeowner checklist, see Steve’s: HVAC cleaning preparation and FAQs.
The bottom line
Professional duct cleaning services are most valuable when they are evidence-driven (clear reasons to clean), method-driven (source removal under positive pressure), and transparent (documented results and a defined scope). Pair that with good filtration and moisture control, and your HVAC system will deliver cleaner airflow with less strain.
Start Breathing Easier.
Your air ducts are the lungs of your home and keeping them clean keeps you and your family healthier and your HVAC equipment working optimally.